
Home Capri Literature Parts ascLiterature ascParts Projects/Misc
Home
Capri Literature
Parts
ascLiterature
ascParts
Projects/Misc
![]() 79-86
Center Console Restoration
79-86
Center Console Restoration ![]()
Please excuse the low quality of some of the pictures. I had to try to use fairly high compression to keep the size of this site under control. Please be helpful and send comments here.
Go to part: 1,2,3,4,5,6,7,8,9,10,11
Part 6: Brackets and Bezels,
Oh My!
Disconnect the large bracket from the wiring harness. You'll need
to push the harness clip out through the hold it is attached to in the
bracket or pull with a pair of pliers while twisting (see red arrow).
You'll also have to do this for the small bracket holding the 3 wiring
harness connectors in the back of the console.
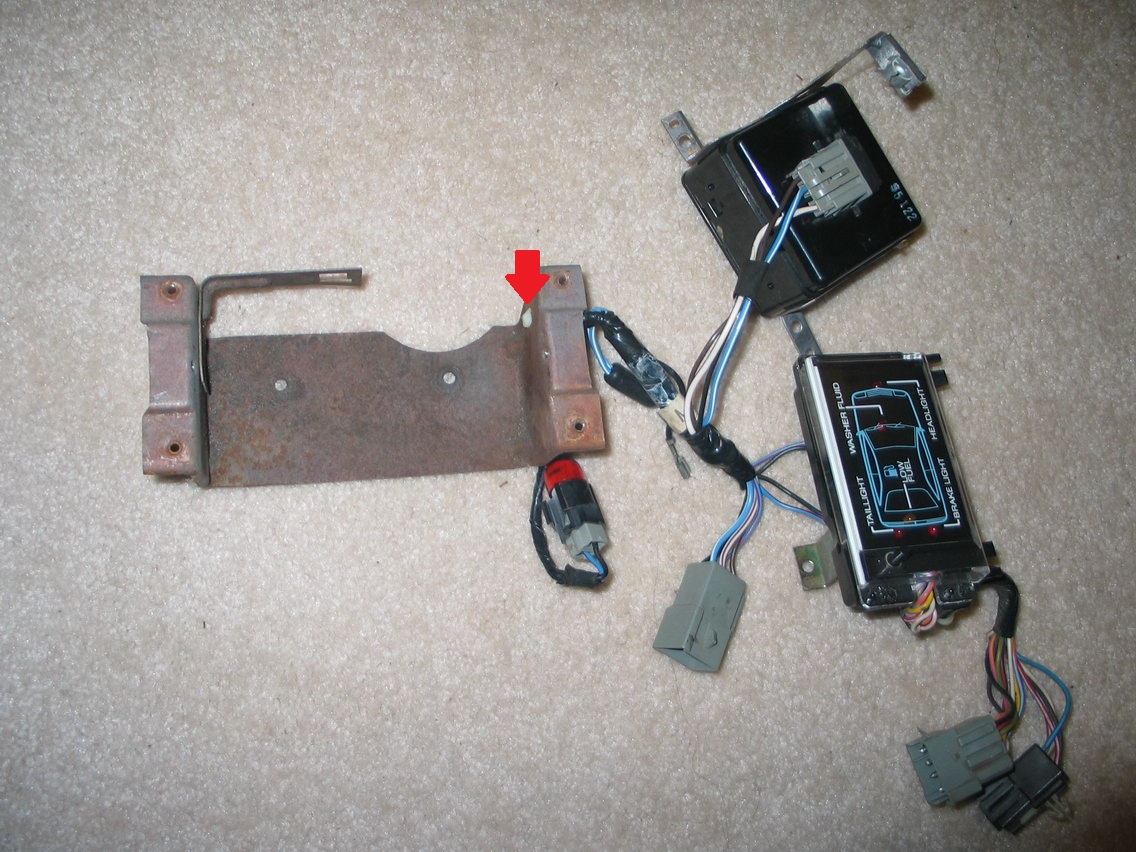
That's one RUSTY bracket!!!

Get a brass wire wheel for your drill. Get many sizes.
Get some wire brushes for your dremel too. Clamp the bracket in a
vise and go to town on it.

You should be
able to pretty much get it down to bare metal and nice and shiny.
For the hard to reach places use the dremel. Then I primered the
brackets and prepared them for paint.
Technically the brackets are
natural or maybe zinc coated. So you could use a clear on it.
Since these are out of the way and I wanted to make sure they shouldn't
rust again, I decided to paint them black. Plust I think it looks
better...not that anyone will see it.

I used the same process on the rear ash tray and the bracket that
holds the console pad to the console hull.
I also cleaned the
information center bezel and the automatic shifter bezel (same guy who
had the console pad latch parts had the shifter bezel too). Those
were sprayed with adhesion promoter instead of primer.
Then
everything was coated with Eastwood's Underhood Black. Good stuff.


As you can see I also sprayed the front ash tray panel and the rear
ash tray. Stay tuned for those parts where I work on those
items.
In Conclusion:
Quick and easy with a
wire brush and a dremel.
Part
7: Is it Ash Tray or Ashtray?
© 2003-2007 Michael Negus All Rights Reserved.
Send Email to:
info@ascmclarencoupe.com
asc McLaren and Fox Bodied Mercury Capri Cars